Step 1 – Prerequisites
Login to your Debian 10 system using shell access. For remote systems connect with SSH. Windows users can use Putty or other alternatives applications for SSH connection.
ssh root@debian10
Run below commands to upgrade the current packages to the latest version.
sudo apt update
sudo apt upgrade
Step 2 – Configure MySQL PPA
MySQL team provides official MySQL PPA for Debian Linux. You can download and install the package on your Debian system, which will add PPA file to your system. Run below command to enable PPA.
wget http://repo.mysql.com/mysql-apt-config_0.8.13-1_all.deb
sudo dpkg -i mysql-apt-config_0.8.13-1_all.deb
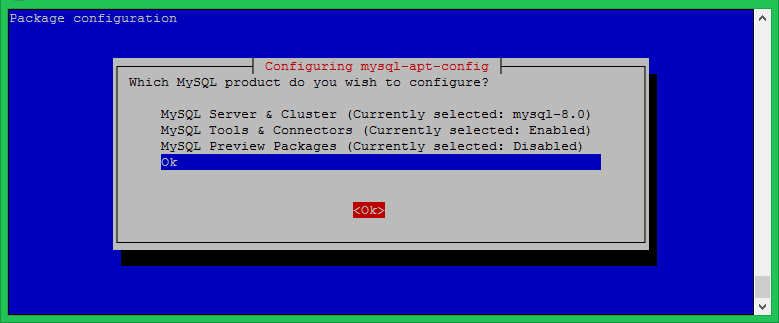
During the installation of MySQL apt config package, It will prompt to select MySQL version to install. Select the MySQL 8.0 or 5.7 option to install on your system.
For this tutorial, we have selected MySQL 5.7 to install on my Debian system. Once you have selected a specific version and you need to change the configuration, use the following command.
sudo dpkg-reconfigure mysql-apt-config
Select a version of your choice and save.
Step 3 – Install MySQL on Debian 10
Your system is ready for the MySQL installation. Run the following commands to install MySQL on a Debian machine.
sudo apt update
sudo apt install mysql-server
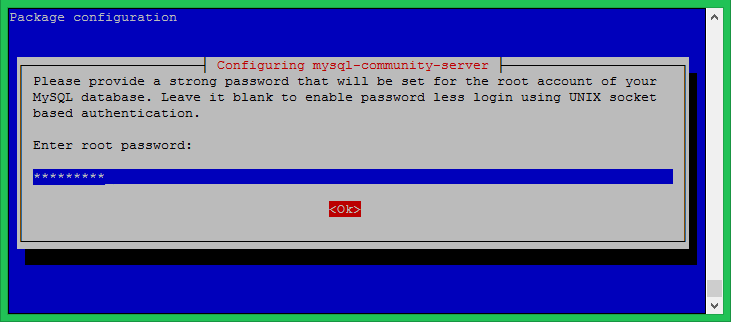
The installation process will prompt for the root password to set as default. Input a secure password and same to confirm password window. This will be MySQL root user password required to log in to MySQL server.
The next window will ask to re-enter the same password.
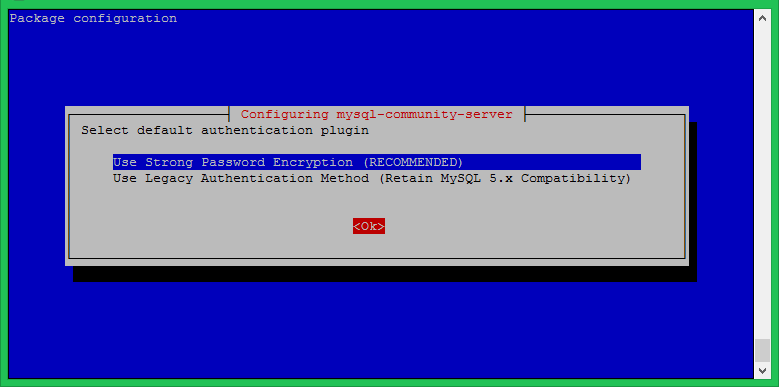
MySQL 8 provides an extended password security option. This is optional but we recommend to go with this option.
Let the installation complete.
Step 4 – Secure MySQL Installation
Execute the below command on your system to make security changes on your Database Server. This will prompt some questions. The do the high security provide all answers to yes.
First start the MysQL service if not started:
sudo systemctl restart mysql.service
Then run below command:
sudo mysql_secure_installation
Follow the on screen instruction’s
Securing the MySQL server deployment.
Enter password for user root:
VALIDATE PASSWORD COMPONENT can be used to test passwords
and improve security. It checks the strength of password
and allows the users to set only those passwords which are
secure enough. Would you like to setup VALIDATE PASSWORD component?
Press y|Y for Yes, any other key for No: y
There are three levels of password validation policy:
LOW    Length >= 8
MEDIUM Length >= 8, numeric, mixed case, and special characters
STRONG Length >= 8, numeric, mixed case, special characters and dictionary                  file
Please enter 0 = LOW, 1 = MEDIUM and 2 = STRONG: 2
[...]
Select a password validation policy to MEDIUM or STRONG. After that, the process will ask to change the password. You can select a more complex password. Follow the other options and complete the wizard.
Step 5 – Connect MySQL
The MySQL server has been installed on your system. Now connect to the MySQL database using the command line.
mysql -u root -p
Enter password:
Welcome to the MySQL monitor.  Commands end with ; or \g.
Your MySQL connection id is 8
Server version: 8.0.17 MySQL Community Server - GPL
Copyright (c) 2000, 2019, Oracle and/or its affiliates. All rights reserved.
Oracle is a registered trademark of Oracle Corporation and/or its
affiliates. Other names may be trademarks of their respective
owners.
Type 'help;' or '\h' for help. Type '\c' to clear the current input statement.
mys